How to add a disk and file share in Azure with powershell commands
Hi lads,
This blog post will teach you how you should do to add a new virtual managed disk to your VM and how to create a file share that is going to be used to transfer SQL server backups from on-prem to the Azure.
By continuing our last post, let’s assume after you have created the virtual machine, you need to add a managed disk to be used along with your computing. Moreover, your CEO asked you to move the SQL server backups from production to this new VM once the CEO’s aim is to start testing its workload in Azure.
Long story short, we will do the following:
- Add a managed disk into your SQLVM01 (previously created on the last blog post)
- Create a new file share and present it to the VM
This next code block is related to create a new managed disk with 20GB in size and an empty one. After defining the configs for the disk, I will attach it into the VM and up to date the VM as the following:
|
1 2 3 4 5 |
$diskConfig = New-AzDiskConfig -Location $Location -CreateOption Empty -DiskSizeGB 20 $dataDisk = New-AzDisk -ResourceGroupName $ResourceGroupName -DiskName "MyDisk" -Disk $diskConfig $VMName = Get-AzVM -ResourceGroupName $ResourceGroupName -Name $vml.VMName $VMName = Add-AzVMDataDisk -VM $VMName -Name "MyDisk" -CreateOption Attach -ManagedDiskId $dataDisk.Id -Lun 0 Update-AzVM -ResourceGroupName $ResourceGroupName -VM $VMName |
For this demo I named this disk as “MyDisk”, but it might be an input parameter within that .CSV file showed on the last post blog in the case where you should create a lot of virtual machines.
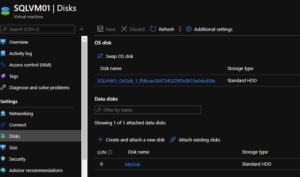
Once you have created this, go to the Azure portal and the disks will be there on virtual machine properties
Now we are going to create the Azure File share to be used to copy files from on-prem to VM in azure.
Before creating an Azure File Share, you must create a storage account, this command will create a storage account for you with some input parameters (referral to the documentation to learn further about that)
|
1 |
New-AzureRmStorageAccount -ResourceGroupName $ResourceGroupName -AccountName "tcaccount" -Location $Location -SkuName Standard_LRS -Kind Storage |
Once it’s done, you should get the storage account parameters (account name, resource group, key, and so on) to be able to proceed to create your file share
|
1 2 3 4 |
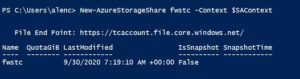
$StgKey = Get-AzureRmStorageAccountKey -ResourceGroupName $ResourceGroupName -AccountName "tcaccount" $StgKeyValue = $StgKey.Value[0].ToString() $SAContext = New-AzureStorageContext -StorageAccountName “tcaccount” -StorageAccountKey $StgKeyValue New-AzureStorageShare fwstc -Context $SAContext |
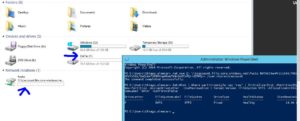
When the above command runs you will see something like that at your command prompt
If you want to make ensure that your file share has been created, got to the Azure portal and look at into your resource group

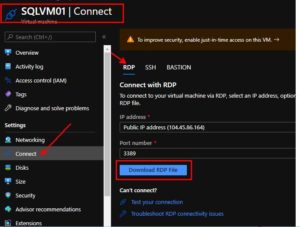
Now we need to log in to our VM in azure and run a command to ensure the file share will be available within our VM, before doing that make sure you haven’t closed yet your power shell command prompt and re-run the $StgKeyValue variable there to get the key back (if you closed it, no problem you can get this value from the azure portal in storage account properties). Copy it over and to be reused later
![]()
Go to the VM in azure and connect
When you log into the machine, run these commands to make the managed disk and file share available to be used.
|
1 2 3 4 5 |
#Make the managed disk avaible into your vm Get-Disk | Where partitionstyle -eq ‘raw’ | Initialize-Disk -PartitionStyle MBR -PassThru | New-Partition -AssignDriveLetter -UseMaximumSize | Format-Volume -FileSystem NTFS -AllocationUnitSize 65536 -NewFileSystemLabel “DATA” -Confirm:$false ##Mount File Share on VM net use Z: \\tcaccount.file.core.windows.net\fwstc RWTAKJ9a+Mr2/y5KK/l0UxVcBGdC3oBQgqDDAjN2+AVVYx5AV/GwQ16+7cM8MXnpWEmW7W8m3oGYoPQiidZfMQ== /user:Azure\tcaccount |
PS – If you want to automatize all these steps, you could create an extension to be carried out when your machine starts, this is out of scope for this blog post, but, look at this article.
https://docs.microsoft.com/en-us/azure/virtual-machines/extensions/features-windows
When you run these scripts, you will have the disk and file share ready to be used as below
References
https://docs.microsoft.com/en-us/azure/virtual-machines/managed-disks-overview
https://docs.microsoft.com/en-us/azure/storage/files/storage-files-introduction
See you next post! TC