Deploy Azure VM in Powershell
 Tempo de leitura: 4 minutos
Hello folks,
Disclaimer – I won’t explain what each cmdlet does, and its parameters are out of the scope of this post and the PowerShell’s syntax, please, to find out more look at Azure Powershell documentation
It’s been a long time since I have written in my blog. After adapting myself to a new country since I moved out of Brazil, I found out time to focus my energy and passion of sharing knowledge with the SQL community tech over again
In this post, we will learn how to deploy a VM in Azure trough the Powershell script. I created this to meet a need in my company to deploy a lot of similar virtual machines in azure which comes from a pre-defined list of VMs in a .csv file. In addition, would like to thank you Felipe Santos (Dicas de Infra) for helping me out on this.
Let’s get started. You should start opening your windows PowerShell ISE tool

Once it’s opened, we should start coding, and your first step must connect into your subscription
|
1 |
Connect-AzAccount |
PS – for the command above a window will pop up asking your azure credentials

if you have more than one subscription, keep in mind in perfmon these commands and select the correct one you want, for our example, I will pick my visual studio subscription up
|
1 |
Get-AzSubscription -SubscriptionName "Visual Studio Enterprise with MSDN" | Select-AzSubscription |
As we well know, all resources in azure must be in a resource group(TCRG in my case) and they should belong to a given location (North Europe in my case, because it is the nearest location where I am today), to avoid re-type it over and over again, I will put them in variables and reuse If needed.
|
1 2 3 |
$ResourceGroupName = "TCRG" $Location = "northeurope" New-AzResourceGroup -Name $ResourceGroupName -Location $Location |
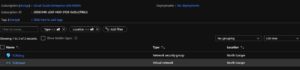
If we go to the Azure portal, we will look an RG (resource group) created there

From here, I am going to create networking stuff such as vnet, subnet, NSG, and subnet inbound and outbound rules.
|
1 2 3 4 5 6 7 8 |
$SubnetName = $ResourceGroupName + "subnet" $VnetName = $ResourceGroupName + "vnet" $SubnetConfig = New-AzVirtualNetworkSubnetConfig -Name $SubnetName -AddressPrefix 192.168.1.0/24 $Vnet = New-AzVirtualNetwork -ResourceGroupName $ResourceGroupName -Location $Location -Name $VnetName -AddressPrefix 192.168.0.0/16 -Subnet $SubnetConfig $NsgRuleInbound = New-AzNetworkSecurityRuleConfig -Name "NsgRuleInbound" -Protocol Tcp -Direction Inbound -Priority 100 -SourceAddressPrefix * -SourcePortRange * -DestinationAddressPrefix * -DestinationPortRange * -Access Allow $NsgRuleOutbound = New-AzNetworkSecurityRuleConfig -Name "NsgRuleOutbound" -Protocol Tcp -Direction Outbound -Priority 101 -SourceAddressPrefix * -SourcePortRange * -DestinationAddressPrefix * -DestinationPortRange * -Access Allow $NsgName = $ResourceGroupName + "nsg" $Nsg = New-AzNetworkSecurityGroup -ResourceGroupName $ResourceGroupName -Location $Location -Name $NsgName -SecurityRules $NsgRuleInbound,$NsgRuleOutbound |
PS – Please, pay atentention that I allowed any connection (inbound and outbound), DON’T DO THAT IN PROD.
So far how our deployment looks like:
PS – note that I haven’t created the IP yet, it is going to be done within a for each later.
Once the networking configuration is done, I will get all VM properties from my VMList.csv file that are being kept at the c:\temp\ path. Let’s look inside of this file
![]()
The PowerShell will load all proprieties from this file into an object. Within the for each statement, I am going to create the IP, interface, SQL server offer, SQL edition, etc.
|
1 2 3 4 5 6 7 8 9 10 11 12 13 14 15 |
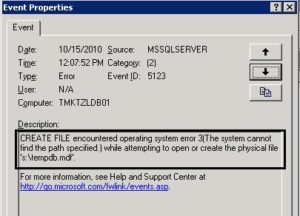
$GetVmList = Import-Csv "C:\temp\VMList.csv" foreach ($vml in $GetVmList) { $SecurePassword = ConvertTo-SecureString $vml.Senha -AsPlainText -Force $Cred = New-Object System.Management.Automation.PSCredential ($vml.Usuario, $securePassword) $PipName = $ResourceGroupName + $(Get-Random) $Pip = New-AzPublicIpAddress -ResourceGroupName $ResourceGroupName -Location $Location -AllocationMethod Static -IdleTimeoutInMinutes 4 -Name $PipName $Interface = New-AzNetworkInterface -Name $vml.Interface -ResourceGroupName $ResourceGroupName -Location $Location -SubnetId $VNet.Subnets[0].Id -PublicIpAddressId $Pip.Id -NetworkSecurityGroupId $Nsg.Id $VMConfig = New-AzVMConfig -VMName $vml.VMName -VMSize $vml.VMsize | Set-AzVMOperatingSystem -Windows -ComputerName $vml.VMName -Credential $Cred -ProvisionVMAgent -EnableAutoUpdate | Set-AzVMSourceImage -PublisherName "MicrosoftSQLServer" -Offer "SQL2016SP2-WS2012R2" -Skus "SQLDEV" -Version "latest" | Add-AzVMNetworkInterface -Id $Interface.Id New-AzVM -ResourceGroupName $ResourceGroupName -Location $Location -VM $VMConfig } |
The command above will take a couple of minutes to run, once It’s done you will see a message like that:

PS – Keep in mind that I went through the Azure Powershell interface to take these values out to have them added to my solution if you need something different from that, please, referral to the Microsoft documentation to figure out what you will need to implement.
This is how our solution should look like int the end of the deployment

Click at the SQLVM01 VM > connect and download the RDP to your machine and sign it up with the credentials previously created in the .csv file

Your machine will be ready to be used! Hope you had enjoyed it and see ya!
Was there another way of implementing and improving this solution? Of course, I could create many “IFs” for validating if something exists or not and so on, but It wasn’t needed on my scenario, feel free to use this solution and improve it.
Um comentário
[…] continuing our last post, let’s assume after you have created the virtual machine, you need to add a managed disk to be […]